Defense in Depth as Code: Secure APIs by design
6 November 2025In the article Secure APIs, we presented a six-step model for building a secure API. This article will show how to implement this model using .NET and highlight key aspects for creating APIs that are secure by design.
All code that we will show here is available at our Github repository, and we encourage you to take a closer look and try it out at https://github.com/Omegapoint/defence-in-depth.
Martin Altenstedt, Omegapoint
There are many ways to implement these principles. The code here is just one way to do it, not a template that will fit everyone. Hopefully, it will help explain the details and challenges we developers face and inspire you to consider these six steps when building APIs.
Erica Edholm, Omegapoint
Please note that even if we use .NET in the examples below, the model and concepts are general and valid for any framework when implementing APIs.
There is also a repo using Java with Spring Security available at https://github.com/Omegapoint/defence-in-depth-java
Our thinking and reasoning result from years of developing applications and performing penetration tests and security code reviews. We base the model on principles of Zero Trust, Least Privilege, and design ideas from the book Secure by Design by Dan Bergh Johnsson, Daniel Deogun and Daniel Sawano.
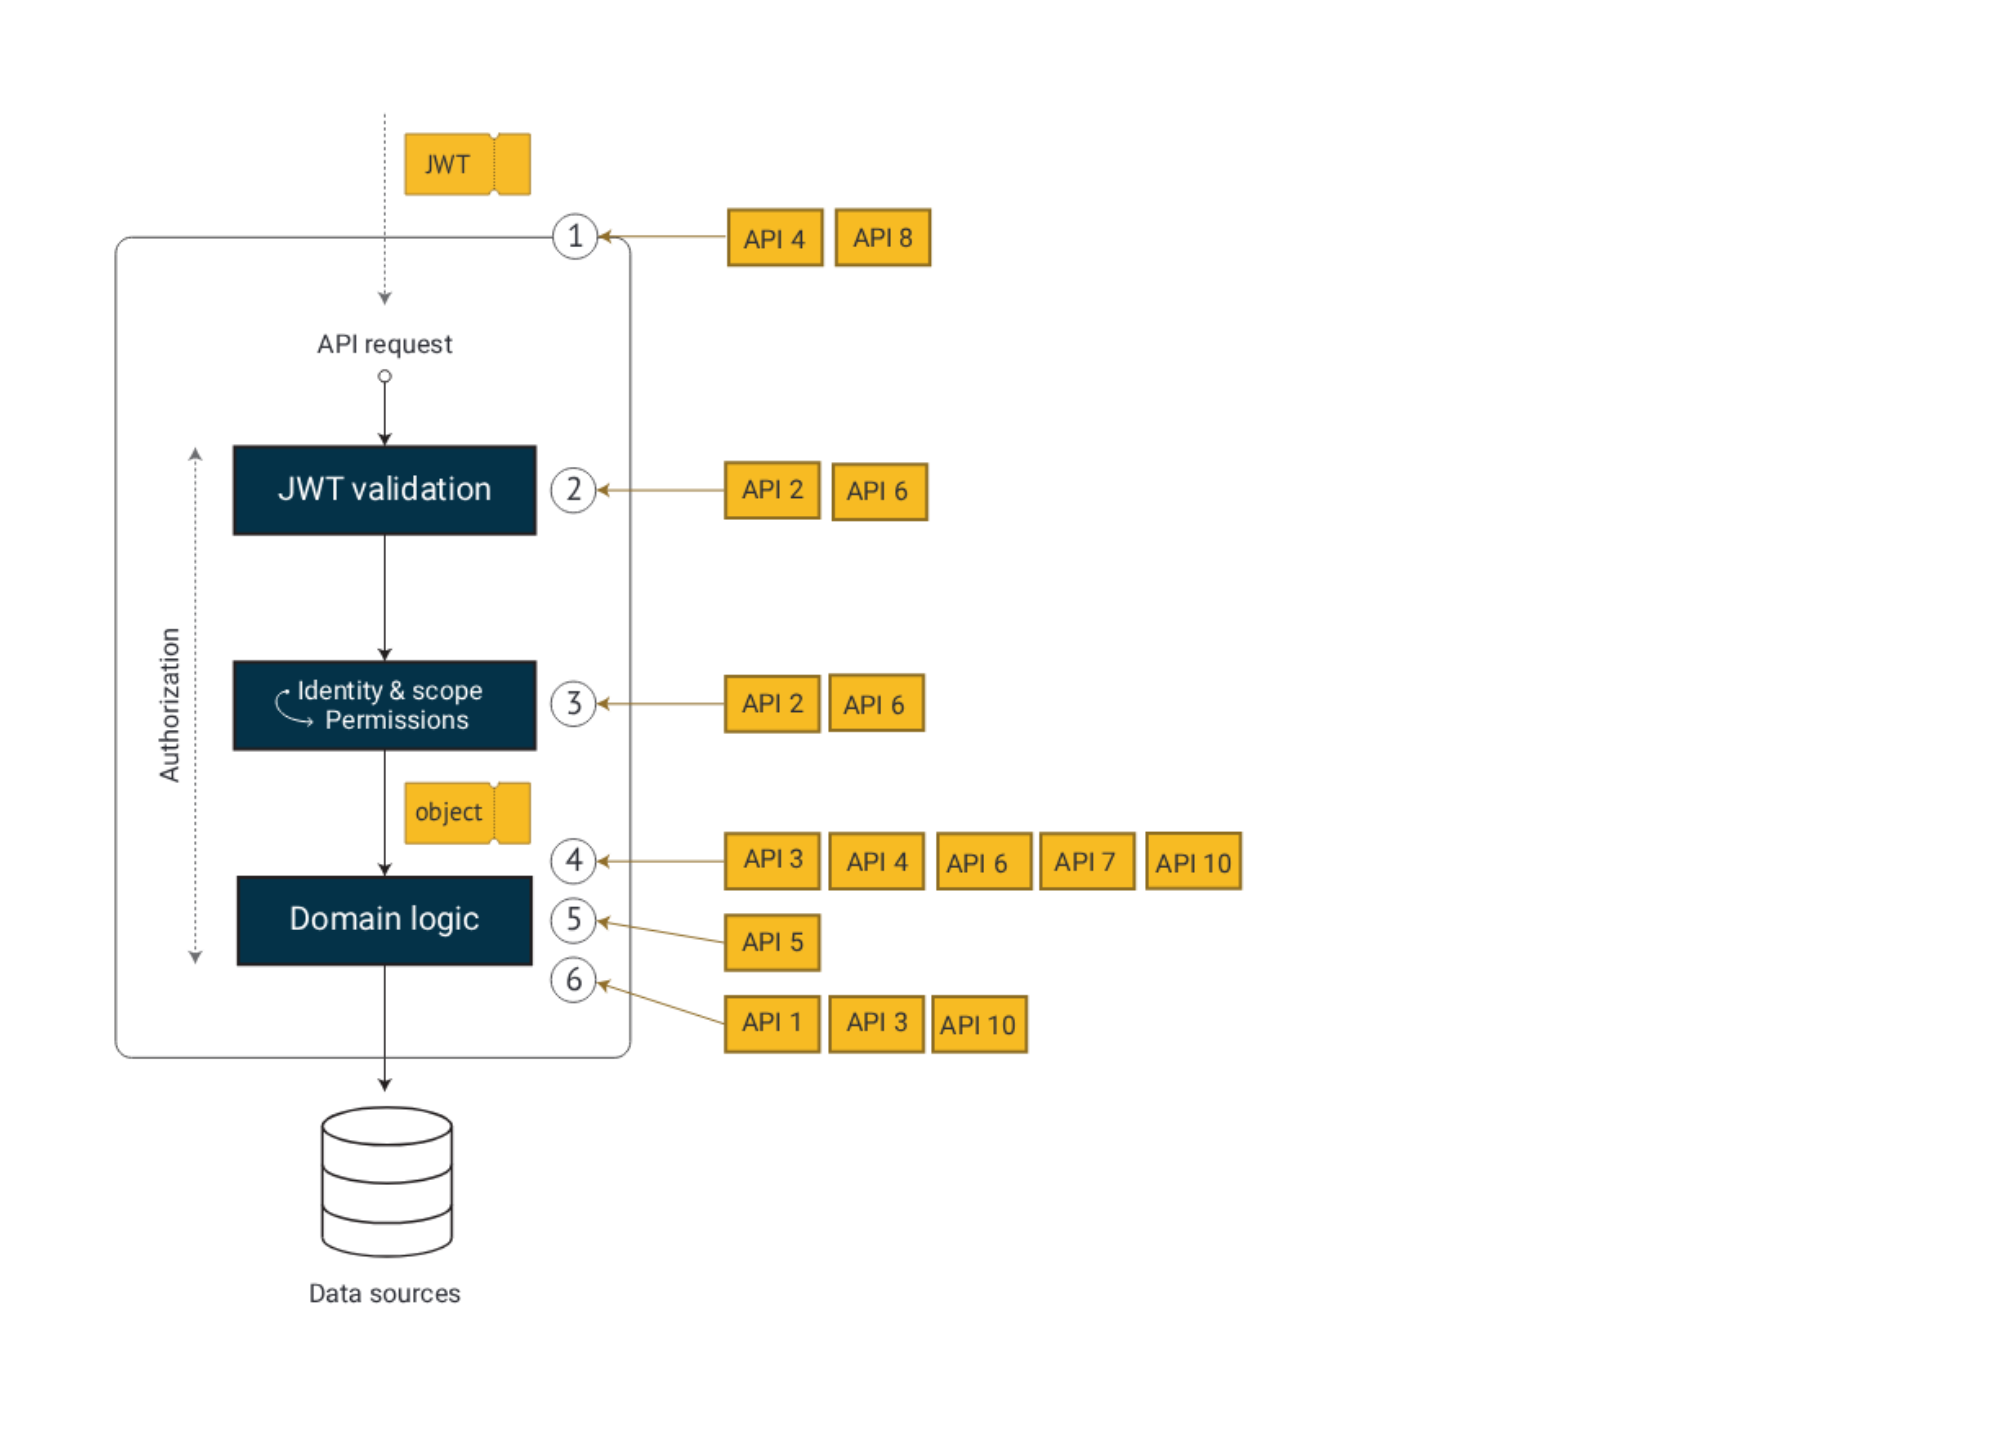
Based on experience, we believe that you need to address all of the following six steps to get a robust solution, regardless of framework and implementation details. We implement strong and fine-grained access control in six steps:
- Validate that the request is correct
- Validate that the access token is correct
- Transform the access token into a permissions model
- Validate that the data in the request is correct
- Validate the permission to execute the operation
- Validate the permission to query or change data
![]()
Note that you still need infrastructure protection in front of your API. A firewall or API gateway can perform access control based on IP or trusted device identification, and initial input validation.
We use Zero Trust and Least Privilege architecture principles to guide our design. For our API, this means that we:
- Authenticate all clients and users
- Verify access control for every request
- Limit permissions for all parties to a minimum
- Consider all networks insecure
We address authentication and access control for every request in our six-step model. We limit permissions for all parties by scopes and audience design in combination with domain logic in steps 5 and 6 above.
We consider all networks insecure and we should always use strong TLS to communicate to and from our API (part of step 1).
However, a common practice is to terminate TLS in a reverse proxy or Kubernetes cluster ingress, before our API host. This might not significantly weaken the Zero Trust principle if we terminate TLS close to the API, but you need to consider a few things:
- How secure is the network where traffic is not encrypted?
- How many people and systems have access to this network?
- How significant is the benefit of TLS termination before the API?
Be very careful where you terminate TLS. Transport layer security is vital for API security, end-to-end TLS is a strong defense layer, if we remove this it is important to understand the risk we introduce.
Martin Altenstedt, Omegapoint
Besides TLS off-loading, API gateway products often also provide so-called Token-offloading. There is nothing wrong with validating the token in an API gateway before our API, and we might even do some basic authorization based on scopes and audience. But we should not rely on this in our API.
In our experience, C# and API Gateways development differ in fundamental ways from a security perspective. Typically, automated unit tests, structured code, and ownership are superior in C#. Token validation and access control are best implemented in our API.
Tobias Ahnoff, Omegapoint
The same reasoning applies to input validation. We can do basic validation in a API gateway (with a WAF-module), but the API should never assume that this has been done.
Note that the order of steps 4 and 5 can vary depending on the framework etc. For example, it is common to perform basic input validation early in the application layer (the controller) and complete deeper validation later in your domain logic (the service layer).
Thus, basic parts of the validation like the max length of a string parameter might be done at least twice. What’s important is that you do it and cancel incorrect requests early without wasting unnecessary system resources.
These six steps are crucial for strong and fine-grained access control. They should be implemented as a mandatory pattern to never expose your core domain logic without access control and validation of all parts of the request, all input data to the domain logic.
Step 1 - Validate the request
The first step in the model is to validate that the incoming request is valid HTTP, with the correct format and a reasonable size. Otherwise, it should be rejected as early as possible before reaching our application code.
These essential parts of step 1 are not API implementation. We get this vital part by configuring a good reverse proxy and web server hosting the API. We will come back to this later in this article. The rest of the steps need to manifest themselves in our C# code to make the API secure by design.
To get a clean start, we create an empty API project using the .NET 9 “web” template:
$ dotnet new web
Instead of using .NET minimal APIs, which also could have been used to implement our secure API, we choose to organize our endpoints in controllers:
var builder = WebApplication.CreateBuilder(args);
builder.Services.AddControllers();

var app = builder.Build(); app.MapControllers();

app.Run();
We can then add a controller that returns a product by its id:
[Route("/api/products")]
public class ProductsController : ControllerBase {
    [HttpGet("{id}")]
    public IActionResult GetById([FromRoute] string id) {
        var product = new { Id = id, Name = "My Product", Market = "se" };
        return Ok(product);
    }
}
We want clear rules for dealing with a request since attackers often use unexpected behavior in our code. We get this by using e g explicit routing. The same reasoning is also valid for the template we used to create the project. It is important to understand how the API is built and be careful with templates that include things you don’t need.
A request to the API will look like this:
GET https://localhost:5000/api/products/1 HTTP/1.1
HTTP/1.1 200 OK
Connection: close
Content-Type: application/json; charset=utf-8
Date: Mon, 25 Dec 2021 06:00:00 GMT
Server: Kestrel
Transfer-Encoding: chunked

{ "id": "1", "name": "My Product", "market": "se" }
Note that we get the correct content type to help the client correctly output encode the returned data. Treating data as code is the root cause of injection vulnerabilities like XSS. Secure defaults from the web server are a critical security aspect.
For the scope of this article, step 1 is now complete. We assume we have strong TLS, secure hosting, and infrastructure defenses like a firewall, API Gateway and WAF in front of us, which provides basic rate-limiting etc. We also have a secure runtime and use secure, hardened frameworks and components, using up-to-date versions of .NET.
Step 2 – Validate the token
For the second step we need a secure JWT middleware. This is not something you should implement on your own, it should only be configuration. In .NET we use:
$ dotnet add package Microsoft.AspNetCore.Authentication.JwtBearer
If we assume that a token service (IdP) is running locally at port 4000, we can modify our program to validate tokens by specifying authority (issuer) and audience using simple configuration:
var builder = WebApplication.CreateBuilder(args);
builder.Services.AddControllers();

builder.Services.AddAuthentication(JwtBearerDefaults.AuthenticationScheme)
  .AddJwtBearer(options => {
        options.Authority = "https://localhost:4000";
        options.Audience = "products.api";
   });

builder.Services.AddAuthorization(options => {
    var policy = new AuthorizationPolicyBuilder()
        .AddAuthenticationSchemes(JwtBearerDefaults.AuthenticationScheme)
        .RequireAuthenticatedUser()
        .Build();

    options.DefaultPolicy = policy;
    options.FallbackPolicy = policy;
});

var app = builder.Build();
app.UseAuthentication();
app.UseAuthorization();
app.MapControllers().RequireAuthorization();

app.Run();
An essential part of step 2 is that we make authorization mandatory. The policy lines in the code above ensure that the default behavior requires an authenticated request. Security should never be opt-in. Instead, you opt out when needed.
Adding RequireAuthenticatedUser to the routing above is redundant since we set both the default and fallback policies, but it now takes two mistakes to open up public endpoints.
Tobias Ahnoff, Omegapoint
When we review code, correctly implemented token validation is one of the first things we investigate. If no kind of mandatory pattern is present, we are likely to find endpoints that are missing authorization and are public by mistake for a larger API.
We wish the ASP.NET team would rename the current template to something like “public-web” and add this kind of code to the base web template. The current template promotes a weaker opt-in security pattern, using only Authorize attributes in each controller, when instead you should be forced to opt-out using the AllowAnonymous attribute.
Reducing risk of exposing API endpoints without access control is an important security aspect.
So, steps 1 and 2 are complete. We now know that all requests are valid HTTP with a valid token when they reach our controller.
There are more things to say about token validation, but we will not go into more details here. See more in OWASP ASVS v5 chapter 9 or on
https://datatracker.ietf.org/doc/html/rfc8725
https://datatracker.ietf.org/doc/html/rfc7519#section-7.2
https://pragmaticwebsecurity.com/cheatsheets.html
Note that we have added code for validating reference-tokens (introspection) and the token type in the repo. How token type is validated might depend on the token service (IdP). We use Duende Identity Server in this sample because it is easy to work with. But there are, of course, many products you can use as a token service issuing the JWT.
https://duendesoftware.com/products/identityserver
For more advanced scenarios, where we need to validate certificate bound tokens using .NET, we recommend to follow the guidelines
https://docs.duendesoftware.com/identityserver/v5/apis/aspnetcore/confirmation
Step 3 – Transform the access token to permissions
In .NET, we often implement step 3 using a claims transformation class:
public class ClaimsTransformation : IClaimsTransformation
{
    public async Task<ClaimsPrincipal> TransformAsync(ClaimsPrincipal principal)
    {
        await Task.CompletedTask;
        if (principal.Identity?.IsAuthenticated == true)
        {
            var identity = new ClaimsIdentity(principal.Identity);
            identity.AddIfScope(
                "products.read",
                new Claim("urn:permissions:products:read", "true")
            );
            identity.AddClaim(new Claim("urn:permissions:market", "se"));

            return new ClaimsPrincipal(identity);
        }

        return principal;
    }
}

internal static class ClaimsIdentityExtensions
{
    public static void AddIfScope(this ClaimsIdentity identity,
                                  string scope, Claim claim)
    {
        if (identity.Claims.Any(c => c.Type == "scope" && c.Value == scope))
        {
            identity.AddClaim(claim);
        }
    }
}
IsAuthenticated will be true above since the JWT middleware in the ASP.NET Core
request pipeline has validated the token and initiated the ClaimsPrincipal for
the current request scope. We typically do not do anything with the incoming
ClaimsPrincipal if not authenticated.
If authenticated, we need to address two things. The first is a transformation of claim types. We typically keep claims from the OIDC and JWT standards as-is, but we might want some custom claims from the token service (IdP) transformed to names that fit our local access model. In our example we don´t change any of the incoming claims.
The second part is that we need to look up and set local permissions. We often do this given the identity of the request combined with the provided scopes, but we can of course use other information from the authentication event which is part of the incoming principal (or has been added in the first part of the transformation.) For example, we might require that the user use MFA for some permissions.
In the code above, the scope products.read will give permission to read
products. The code also adds a permission to a specific market. Typically, we
base the market value on the user’s identity (the sub claim) and query a
database or service, but we hard-code it here for brevity.
We highly recommend prefixing the local permissions so that you can easily
separate them from the standard OIDC and JWT standards claims. We choose the
urn:permissions prefix for permissions. Note that representing permissions as
.NET Claims may not be optimal, but it is commonly used. We will address this in
the section “Secure by design”.
Before moving to step 4, we want to emphasize the importance of striking the right balance between what the token contains and the permissions we need for access control.
How we model identity and scopes are essential for how fine-grained our access control can be and how we can adapt as the system grows, see more on this in our article on Identity Modelling.
Step 4 – validate data in the request
All parts of the request are untrusted and need to be validated. Step 1 validated all aspects of the standard HTTP format using ASP.NET Core defaults, and step 2 validated the JWT in the Authorization header. In step 4, we need to validate all the data in the request.
For the endpoint in our controller, we have one parameter: the product identifier. In our case, the identifier is not an arbitrary string of any size! It can contain only letters and digits and be ten characters or less. If the input string does not follow those rules, we can immediately return a 400 Bad Request. This input validation will make injection attacks a lot harder.
if (string.IsNullOrEmpty(id) || id.Length > 10 || !id.All(char.IsLetterOrDigit))
{
    return BadRequest("Parameter id is not well formed.");
}
Note that what we return is important for security in several ways. Returning the correct HTTP status code (in this case 400) is important for logging, monitoring and intrusion detection. Returing a static error message, providing only information about which parameter that failed validation, will give the API consumer enough information to understand what needs to be fixed, without leaking detailed techical information and internal domain logic to an attacker.
Miranda Aldrin, Omegapoint
A common mistake is to serialize exceptions or provide internal debug information, only meant for developers. This information should only be logged and not be returned in the HTTP response. But it is a balance, and you could argue that we should not provide the parameter information at all.
In our example, the parameter is of type string because it can contain digits and letters, according to our business rules. But for other parameters like dates, numbers of items, etc., we should utilize the fact that the C# is a strongly typed language and use the corresponding types like DateTime and int. Using string should be the last type chosen for input parameters.
Selecting types like DateTime and int will reduce attack vectors significantly compared to a string, but we should still verify that the values meet our requirements. For example, it might not make sense to accept dates 100 years into the future, negative count values, etc. The book Secure by Design, chapters 4 and 5, will provide more details.
Note that well-defined domain rules and validation will not only limit injection attack vectors, it is also a layer of defense for Denial of Service attacks and attacks on the domain.
With the first four steps complete, we now know that all parts of the request are validated.
Step 5 – validate permission to perform the operation
We base the permission to perform an operation on the transformed permissions in our domain code and not directly with scopes and user identity.
if (!User.HasClaim("urn:permissions:products:read", "true"))
{
    return Forbid();
}
The correct status code to return if we fail to validate permission to perform
the operation is 403 Forbidden.
Step 6 – validate permission to access the data
The final step is to validate access to the actual data that the request will read or modify. Sometimes we can validate access by looking at the request, and other times we need to retrieve the data before deciding.
In our example, we need to retrieve the product before verifying that the user has access to the product’s market.
if (!User.HasClaim("urn:permissions:market", product.Market))
{
    return NotFound();
}
We can choose between HTTP status codes 403 Forbidden and 404 Not Found if we
fail to validate permission to the data, depending on if we want to reveal that
data exists or not, respectively.
Validation of access to data is often overlooked and is called Insecure Direct Object Reference vulnerability (IDOR) or Broken Object Level Authorization (BOLA, No 1 on the https://owasp.org/www-project-api-security/). Failure to validate data access means the attacker can access any product by iterating product identifiers. Note that making identifiers hard to guess using randomized values or GUID does not mitigate this vulnerability. It will make it harder for the attacker, but identifiers often leak, and you can’t revoke access.
We are now in a position where we have implemented all six steps. Even if we expose this API without infrastructure protection from a firewall or API gateway, we have a lot of defenses in place.
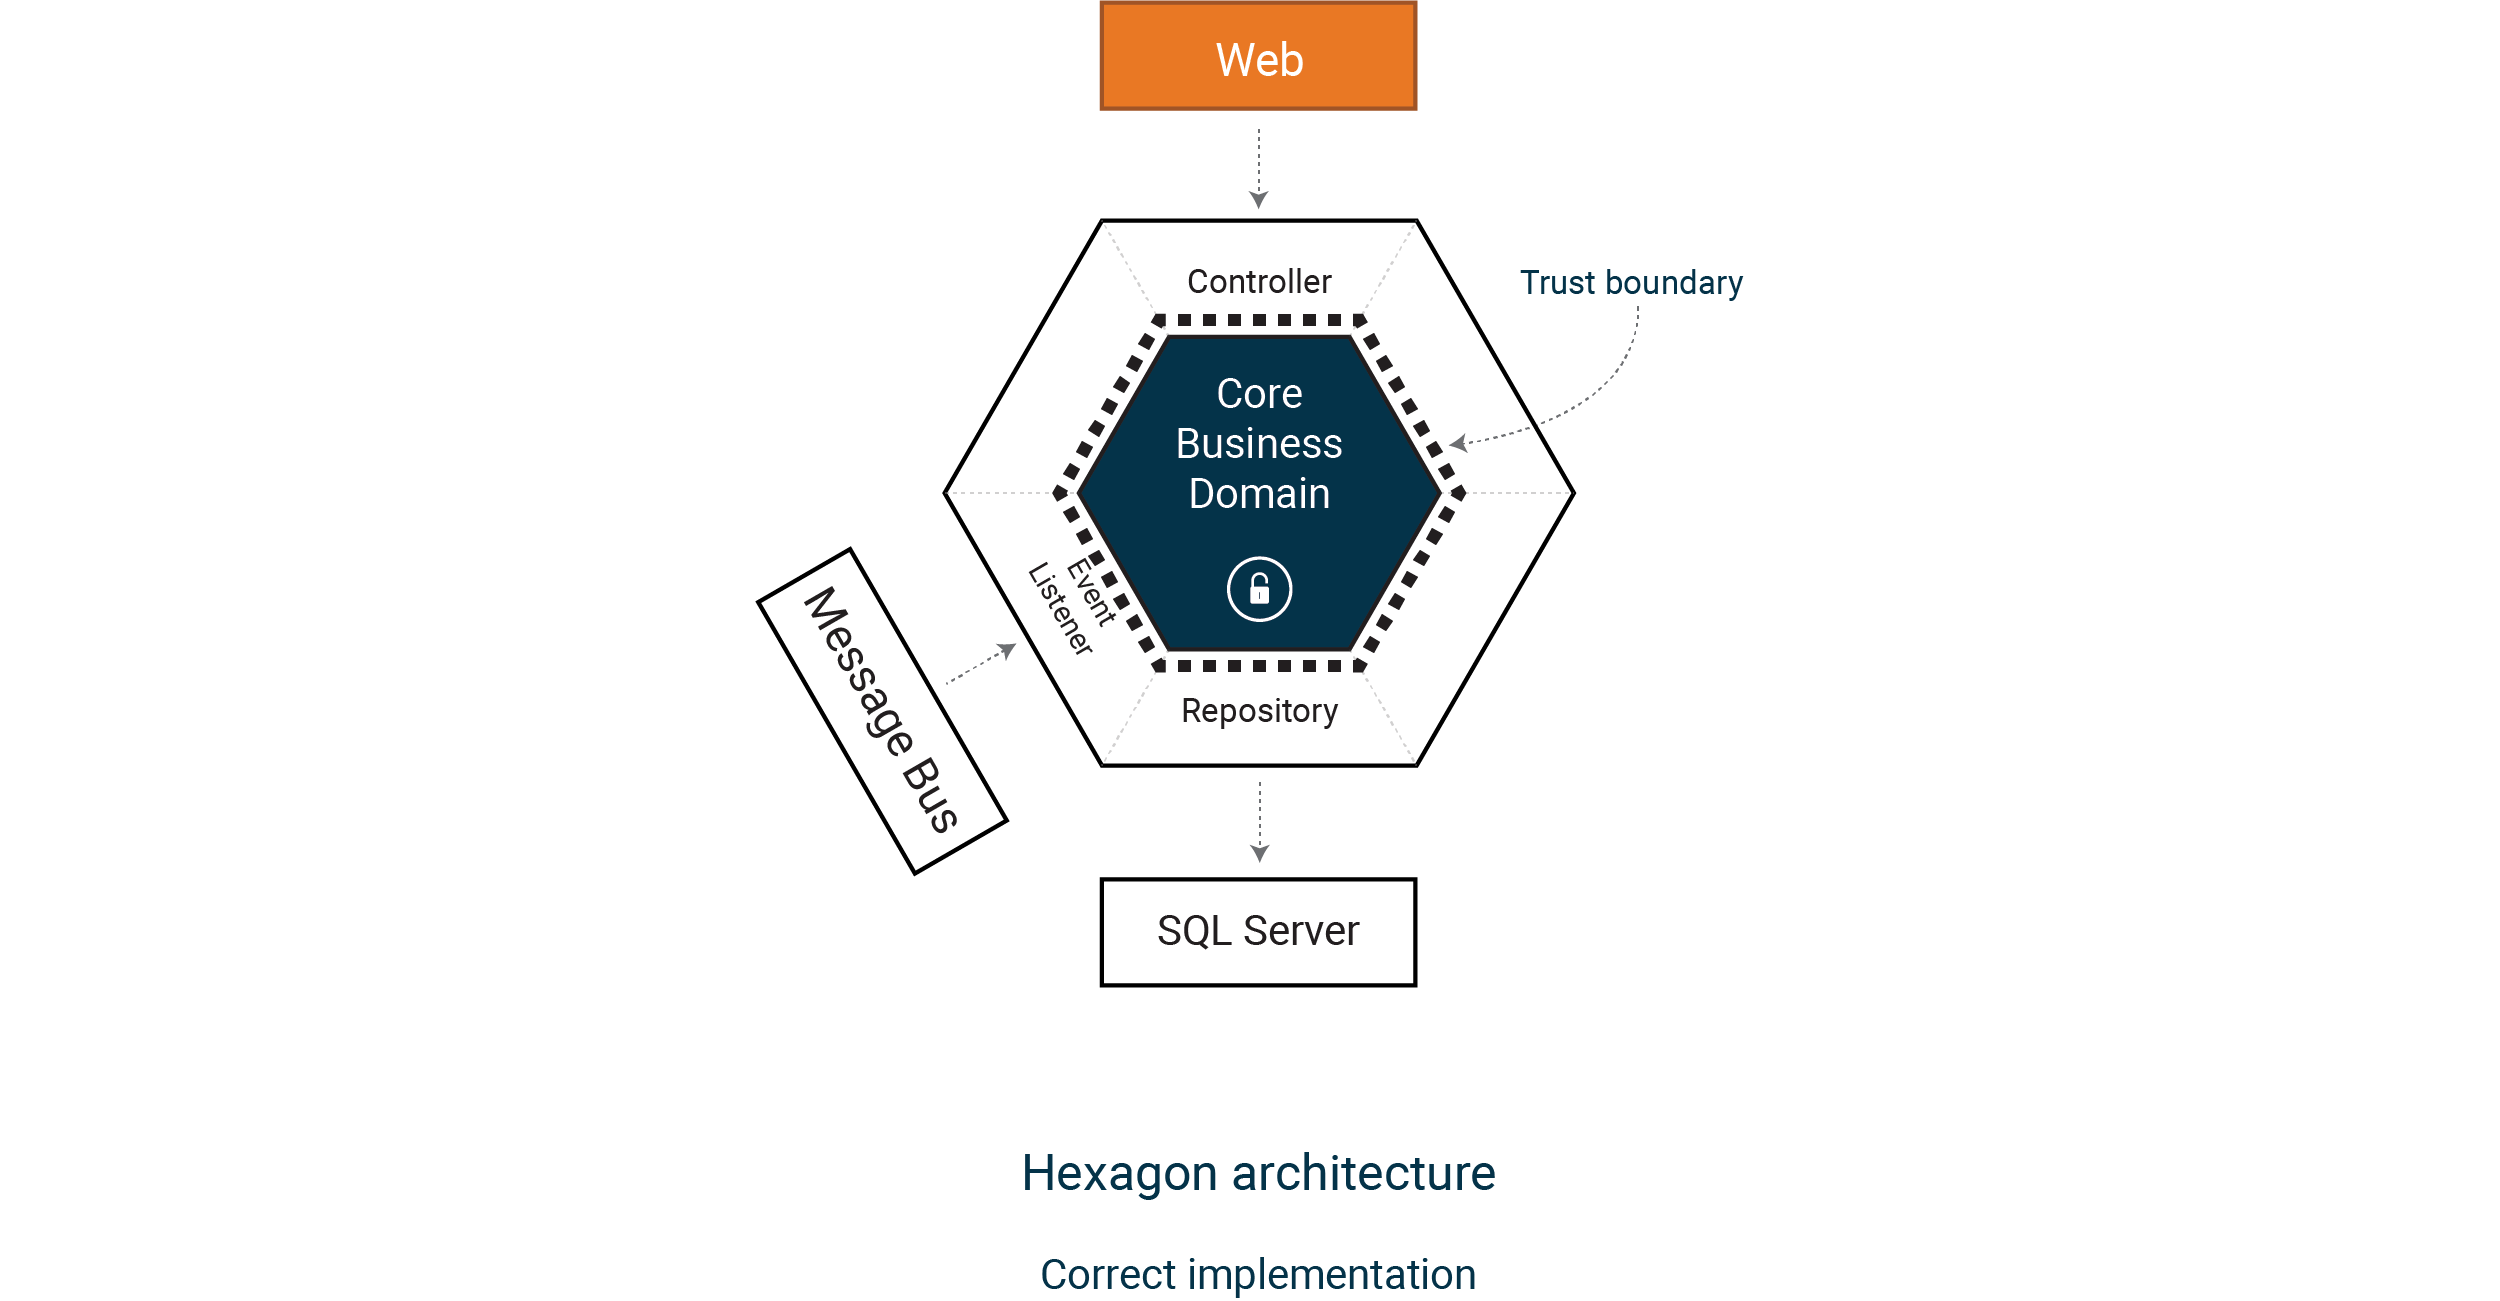
But the API implementation will probably not scale well as our system grows in scope and features. Typically, we would not put business logic like retrieving a product directly in our controller as we have done here. We will address this in the section “Secure by design”. Before we do that, we will elaborate on the importance of trust boundaries and how this will affect our design.
Trust boundaries
A common pattern is introducing a service layer and a repository pattern. We could easily extract the code that retrieved the product into a service class and use a repository pattern in our example.
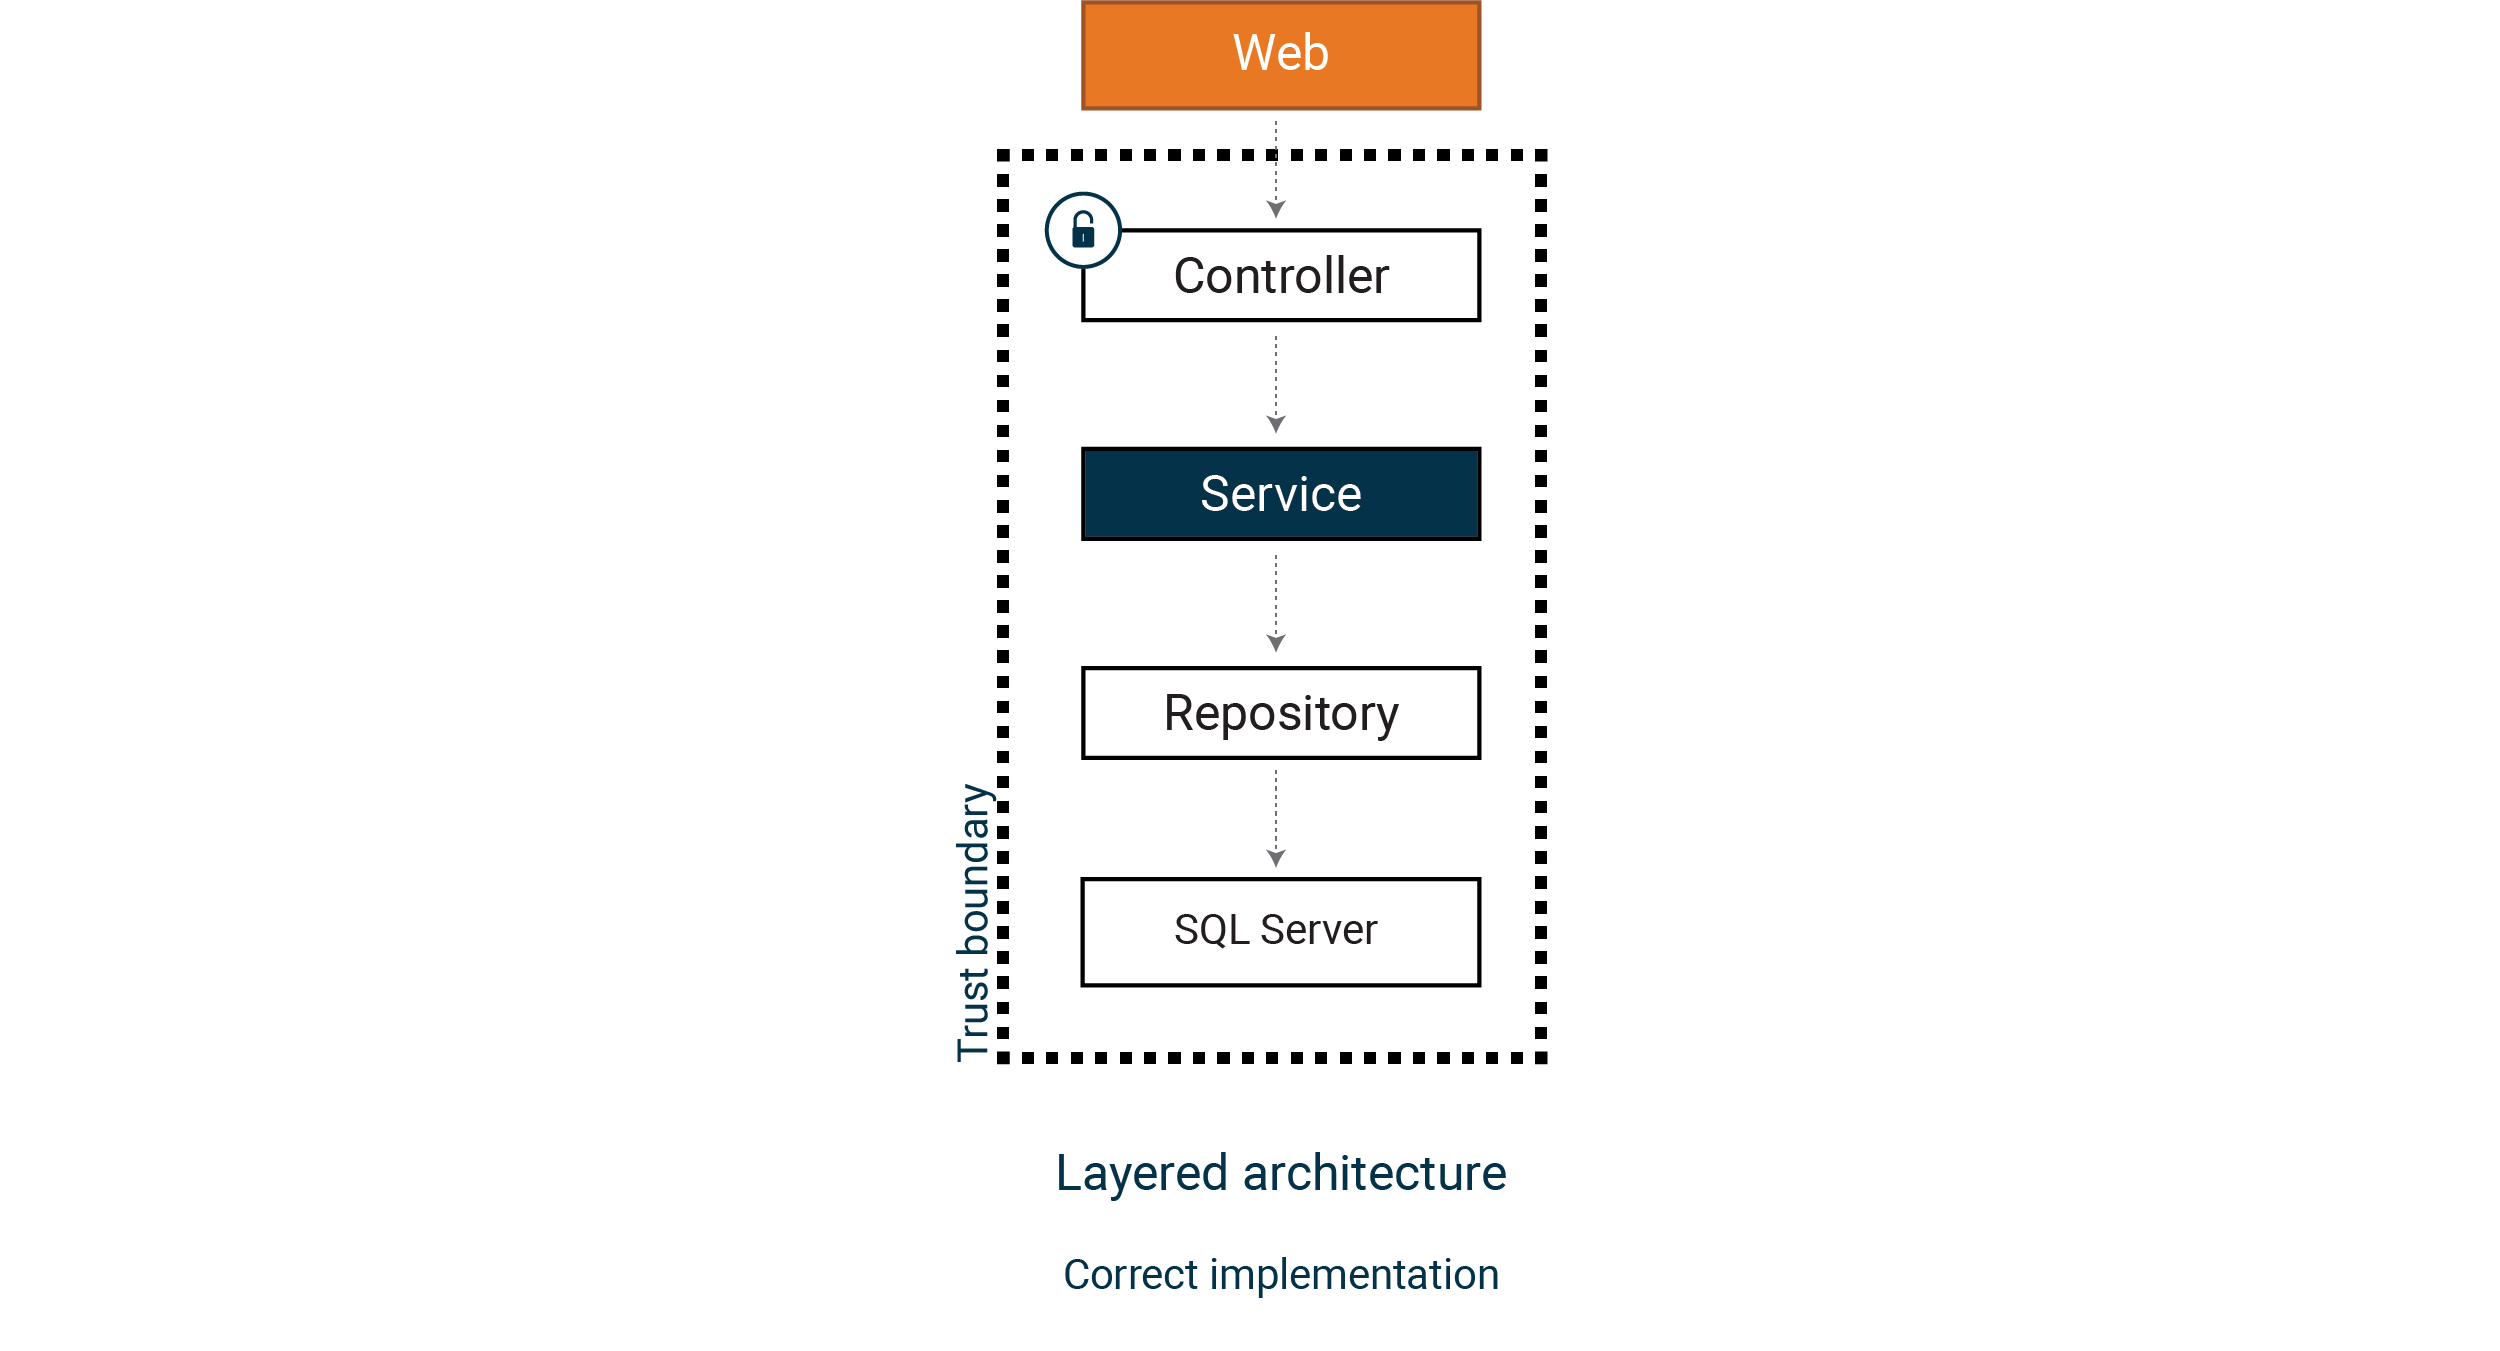
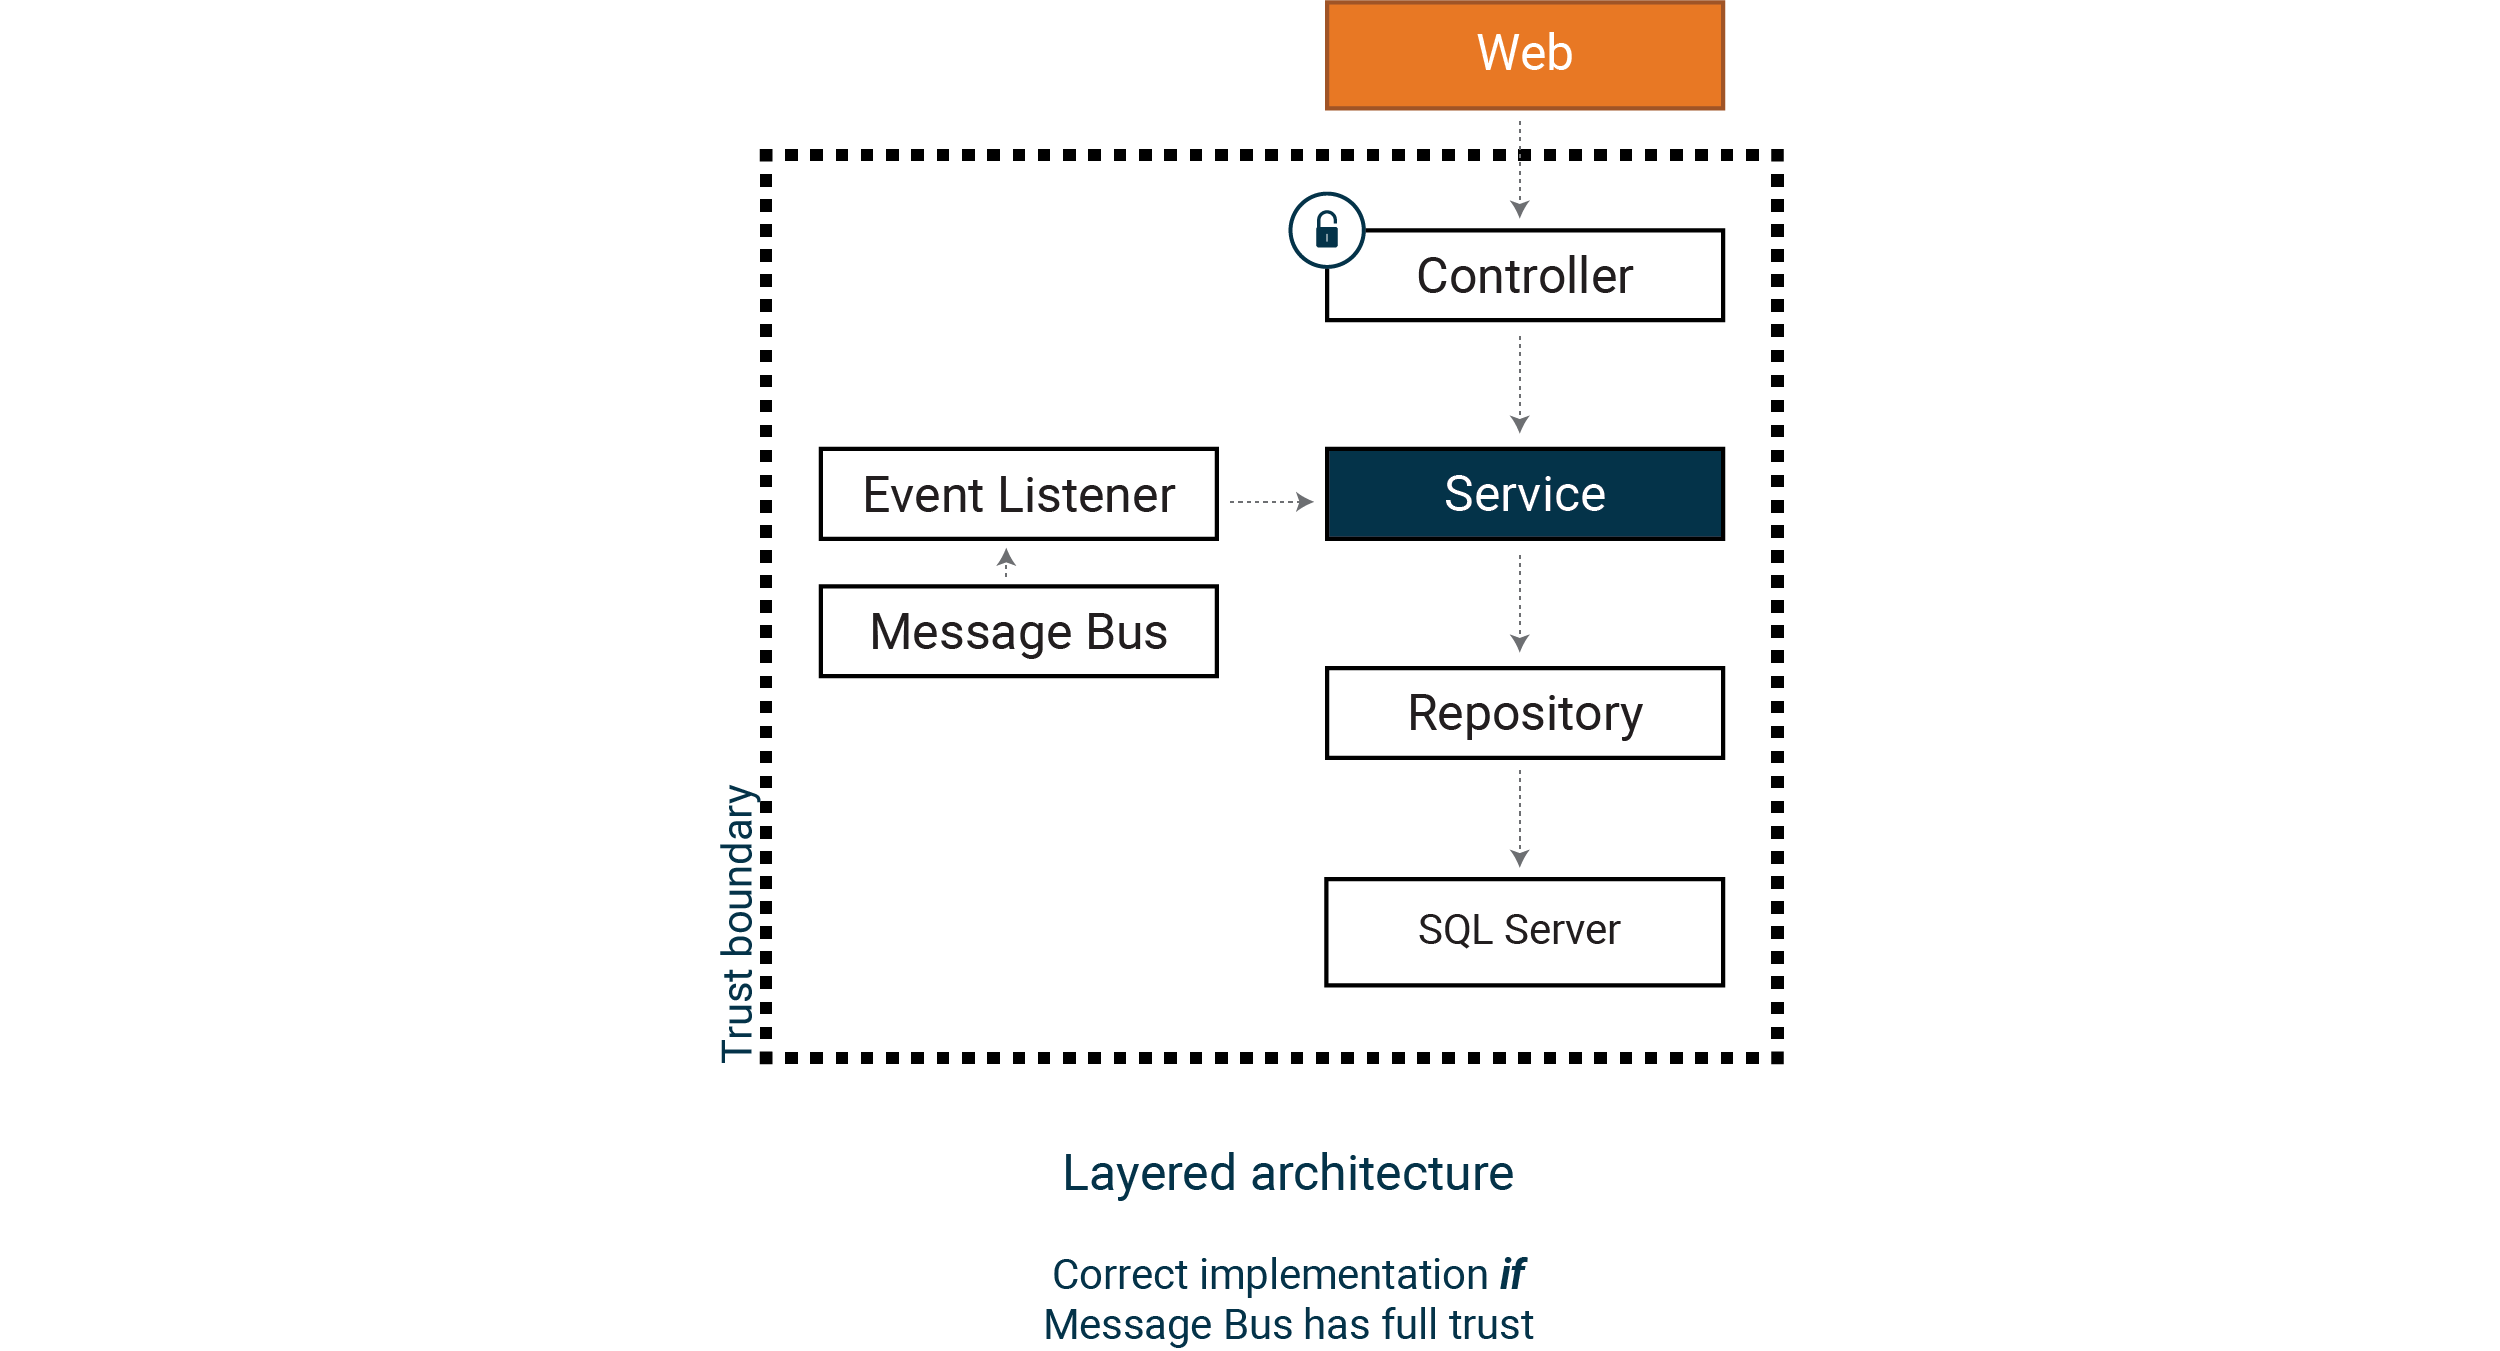
But consider a new entry point to the service layer, for example, that we listen to incoming messages from a service bus or introduce a second controller. Since the validation logic and access control is still in the controller, we have given the service bus messages full trust to our service logic. This might be okay, but often it is not what we intended.
The obvious solution is to move the validation logic and access control into our service layer. This way, any code that uses the service logic is subject to the controls that we have implemented in our six-step model.
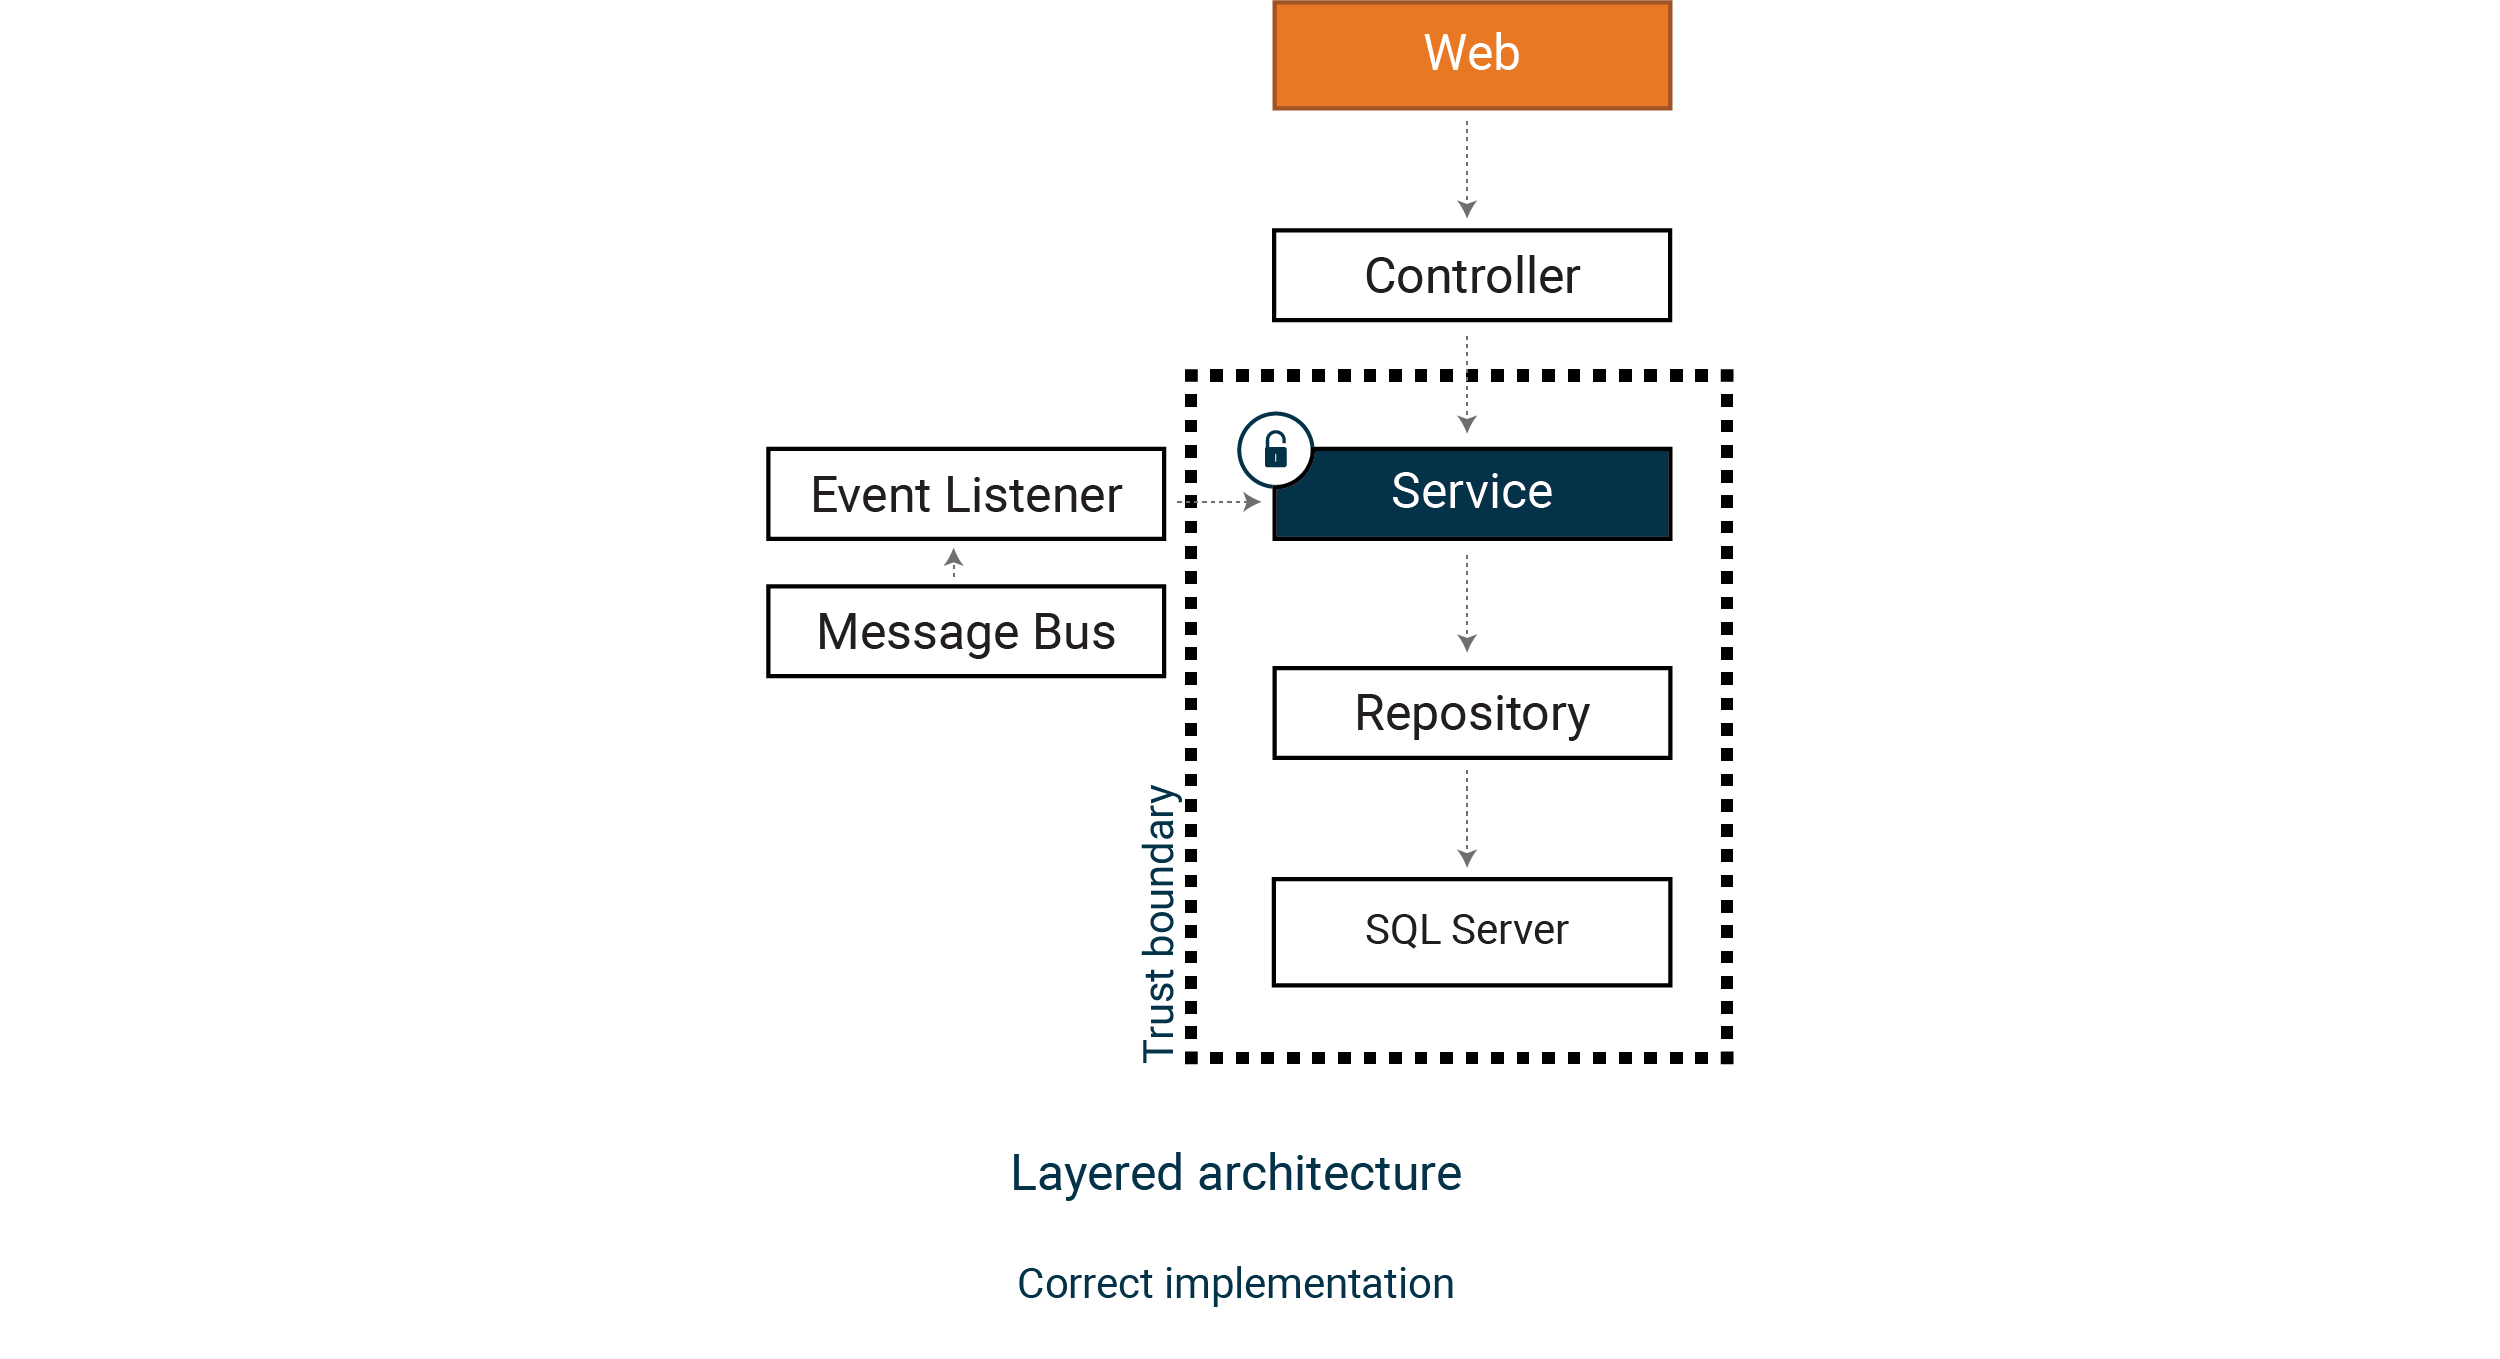
But the repository and the data source (SQL Server) is still within our trust boundary, which can be problematic if it is a shared database. This leads us into a deeper pattern from the book Secure by Design.
Picture a Core Business Domain that contains all our validation and access control. We embrace Domain Drive Design and think of our Core Business Domain as a trust boundary, where all objects are part of the domain, and input data is never trusted.
For example, in our case, the Core Business Domain could refuse to deal with product ids as strings and instead require a domain primitive that includes validation.
We will have a robust, high-quality implementation and a more secure one. Quality and security often go hand in hand.
Let’s look at our implementation again and move to a core business domain model.
Secure by Design
To start, we introduce a “domain primitive” in the ProductId class that will validate input data and throws an exception if not valid.
public record ProductId : IDomainPrimitive
{
    public ProductId(string id)
    {
        AssertValidId(id); Value = id;
    }

    public string Value { get; }

    public static bool IsValidId(string id)
    {
        return !string.IsNullOrEmpty(id) &&
                id.Length < 10 &&
                id.All(char.IsLetterOrDigit);
    }

    public static void AssertValidId(string id)
    {
        if (!IsValidId(id))
        {
            throw new DomainPrimitiveArgumentException(id);
        }
    }
}
We can now create a service class that accepts this domain primitive as input to the GetById method. We move all access control code into the service class and our business domain.
public class ProductService : IProductService
{
    private readonly IPermissionService permissionService;
    private readonly IProductRepository productRepository;
    private readonly IAuditService auditService;
    private readonly IMapper mapper;

    public ProductService(IPermissionService permissionService, IProductRepository productRepository,
        IAuditService auditService, IMapper mapper)
    {
        this.permissionService = permissionService;
        this.productRepository = productRepository;
        this.auditService = auditService;
        this.mapper = mapper;
    }

    public async Task<(Product product, ReadDataResult result)> GetById(ProductId productId)
    {
        if (!permissionService.CanReadProducts)
        {
            await auditService.Log(DomainEvent.NoAccessToOperation, productId);
            return (null, ReadDataResult.NoAccessToOperation);
        }

        var entity = await productRepository.GetById(productId.Value);
        if (entity == null)
        {
            return (null, ReadDataResult.NotFound);
        }

        var product = mapper.Map(entity);
        if (permissionService.MarketId != product.MarketId)
        {
            await auditService.Log(DomainEvent.NoAccessToData, productId);
            return (null, ReadDataResult.NoAccessToData);
        }

        await auditService.Log(DomainEvent.ProductRead, productId);
        return (product, ReadDataResult.Success);
    }
}
This pattern will assert that we always work with correct, validated domain objects in our domain. It will also enforce access control, regardless of how you consume the service.
Note the audit logging, important for accountability and detecting intrusions and misuse.
We introduce a permission service instead of working directly with ClaimsPrincipal and key-value claims. This service enables us to represent permissions in a strongly-typed way that suits our domain.
public class HttpContextPermissionService : IPermissionService
{
    public HttpContextPermissionService(IHttpContextAccessor contextAccessor)
    {
        var principal = contextAccessor.HttpContext?.User;
        if (principal == null)
        {
            if (contextAccessor.HttpContext == null)
            {
                throw new ArgumentException("HTTP Context is null", nameof(contextAccessor));
            }

            throw new ArgumentException("User object is null", nameof(contextAccessor));
        }

        Subject = principal.FindFirstValue("sub");
        ClientId = principal.FindFirstValue("client_id");

        // It is important to honor any scope that affect our domain
        IfScope(principal, "products.read", () => CanReadProducts = true);
        IfScope(principal, "products.write", () => CanWriteProducts = true);

        // There is a balance between this class and ClaimsTransformation. In our case,
        // which market a user belongs to could be added in ClaimsTransformation, but
        // you might find that that kind of code is better placed here, inside your
        // domain, especially if it requires an external lookup. In real world scenarios
        // we would most likely lookup market information etc given the identity.  Here
        // we have just hard coded the market to SE for all users.
        MarketId = new MarketId("SE");
    }

    public bool CanReadProducts { get; private set; }
    public bool CanWriteProducts { get; private set; }

    public MarketId MarketId { get; private set; }

    public string Subject { get; private set; }
    public string ClientId { get; private set; }

    private static void IfScope(ClaimsPrincipal principal, string scope, Action action)
    {
        if (principal.HasClaim(claim => claim.Type == "scope" && claim.Value == scope))
        {
            action();
        }
    }
}
The transformation from token claims to permissions has moved from the ClaimsTransformation class to this service with this approach. This strongly-typed solution might be a better approach when handling more complex permission models and doing external lookups and caching.
Note that this kind of code lends itself nicely to unit tests. You can find examples of tests focusing on security in the repo; good test coverage is vital for security-critical code like this.
Coming back to the controller, we can now use the product service.
[Route("/api/products")]
public class ProductsController : ControllerBase
{
    private readonly IProductService productService;
    private readonly IMapper mapper;

    public ProductsController(IProductService productService, IMapper mapper)
    {
        this.productService = productService; this.mapper = mapper;
    }

    [HttpGet("{id}")]
    public async Task<ActionResult> GetById([FromRoute] string id)
    {
        if (!ProductId.IsValidId(id))
        {
            return BadRequest("Id is not valid.");
        }

        var productId = new ProductId(id);
        var (product, result) = await productService.GetById(productId);

        switch (result)
        {
            case ReadDataResult.NoAccessToOperation:
                return Forbid();
            case ReadDataResult.NotFound:
            case ReadDataResult.NoAccessToData:
                return NotFound();
            case ReadDataResult.Success:
                var contract = mapper.Map(product);
                return Ok(contract);
            default:
                throw new InvalidOperationException($"Result kind {result} is not supported");
        }
    }
}
Error and exception handling is a vital API security aspect. To detect
intrusions, we need a high-quality system without false positives that hide
malicious activity. Well-designed clients to the API will never cause input data
violations or NoAccessToData events.
Correct HTTP status codes are essential for security. An unexpected rise in 400,
401, 403, or 404 might indicate an attack.
Note that the service class does not return HTTP status codes. Remember that you can use our service from contexts where HTTP status codes are irrelevant, like message bus integrations.
We only raise exceptions when something we did not design for has happened. One
example of this strategy is the ProductId class, where IsValid() does not throw,
but the constructor does. Our design always validates input data before we
create domain primitives, so the constructor should never fail and thus throws
an exception.
We recommend reading chapter 9 in Secure by Design for more in-depth reasoning about this.
Note that ASP.NET Core handles exceptions without leaking information to the client. There is no need for try-catch-log-rethrow logic. ASP.NET Core 6 does have a built-in developer exception page when built-in development mode, so always make sure that you build for production when you deploy.
Also, note that we use separate data contract classes for the response, preventing data leakage from our domain.
Martin Altenstedt, Omegapoint
You do not have to use Domain-Driven Design (DDD) to create a secure API. But it is important to clearly identify the trust boundaries and keep domain-specific logic in the domain. Even if we do basic authorization and validation of some basic domain rules in the web layer, using ASP.NET Core attributes or in a reverse-proxy or WAF in front of us, we need to do this in our domain as well. And we should avoid duplicating more advanced domain rules outside of the domain.
The DDD thinking is good design, will introduce a pattern that is harder to opt-out of and aligns well with the Defense in depth principle. But as we said, this is just one way to do it.
From an application code perspective, we have now done what we can. But security is a lot more than application code. To get a secure API, we need to build the API so that it is easy to set up the hosting environment, handle secrets and keep all components like Docker images and libraries up to date.
This is well summarized by the pattern Rotate, Repave and Repair, secure APIs requires automation (see more on https://devopedia.org/three-rs-of-security or in Secure by Design chapter 10.7).
Hosting — support Repave and Repair
Today it is common to run ASP.NET Core applications using Docker and NGINX. Kestrel benefits from a secure, hardened reverse proxy facing the internet, and it is important that the proxy:
- Force secure TLS
- Add security headers relevant for APIs
The repo contains code highlighting some key aspects for hosting the API. We have configured NGINX to allow TLS 1.3 only, but in real-world scenarios, you might need to support 1.2, and then you hopefully can omit support for weak ciphers.
Sites like SSL Labs will guide you and analyze the quality of your TLS configuration.
Security headers are from the OWASP recommendations. They are easy to add and help mitigate certain kinds of attack vectors.
# Conceptual NGNIX configuration
server {
    listen        443 ssl;
    server_name   example.com;

    ssl_certificate     example.com.crt;
    ssl_certificate_key example.com.key;
    ssl_protocols       TLSv1.3;

    location / {
        # Add security headers for APIs according to
        # https://cheatsheetseries.owasp.org/cheatsheets/REST_Security_Cheat_Sheet.html
        # Remove if set by the API application framework or if other caching policy is a
        # requirement
        add_header Cache-Control no-store always;
        add_header Content-Security-Policy "frame-ancestors 'none'" always;
        add_header Content-Type application/json always;
        add_header Strict-Transport-Security max-age=31536000 always;
        add_header X-Content-Type-Options nosniff always;
        add_header X-Frame-Options DENY always;

        proxy_pass         http://127.0.0.1:5000;
        proxy_http_version 1.1;
        proxy_set_header   Upgrade $http_upgrade;
        proxy_set_header   Connection keep-alive;
        proxy_set_header   Host $host;
        proxy_cache_bypass $http_upgrade;
        proxy_set_header   X-Forwarded-For $proxy_add_x_forwarded_for;
        proxy_set_header   X-Forwarded-Proto $scheme;
    }
}
Note that the reverse proxy often terminates TLS, which might be fine if it runs close to the API (Kestrel). By forwarding headers, the ASP.NET Core pipeline will trust that no one is in the middle (between the NGINX and Kestrel) and will treat the traffic as if it was HTTPS.
Docker is a common way to host new APIs today. For secure hosting, we need:
- A secure image source, like the official ASP.NET Core image we use here.
- Run the process with Least Privilege, not as root, use a low privilege account.
FROM mcr.microsoft.com/dotnet/sdk:6.0 AS build-env

WORKDIR /app COPY . ./

RUN dotnet publish --output /app/out --configuration Release ./

FROM mcr.microsoft.com/dotnet/aspnet:6.0

WORKDIR /app COPY --from=build-env /app/out .

# Do not run as root user
RUN chown -R www-data:www-data /app USER www-data

# Select a non-root port
ENV ASPNETCORE_URLS=http://_:5000

ENTRYPOINT ["dotnet", "My.Assembly.dll"]
It is important to note that we have infrastructure and configuration as code. With a CI/CD pipeline, we can support Repave, Repair, and have reasonable control over assets management for our network by using code reviews and pull requests, but we have currently not included code for CI/CD pipelines and cloud infrastructure in our repo.
Secrets — support Rotate
Secrets should never leave the environment they are meant for, especially secrets that gives access to production data. And they should be easy to rotate. Also, humans should not use system accounts when performing normal operations or development.
Rotation is hard, so use authentication services from your platform, like Azure Managed Identity. If that is not possible, store secretes in Vault-services like Azure Key Vault, look them up at runtime, and do manual or (semi-)automatic rotation.
By using Azure Managed Identity for reaching the Key Vault, secrets never leave the Vault (the production environment), and we have a design that supports rotation. As an example we have added code for integration with Azure Key Vault in our repo.
Security tests and verification
But even if the API seems secure now, we really don’t know until we performed testing with focus on security. A good place to start is OWASP.
Pontus Hanssen, Omegapoint
Note that testing performed by the development team while crucial for security and quality, it does not replace the need for external security reviews and penetration tests. Read more at Offensive application security.
It is essential to understand the most common type of attacks and how they all work to create strong layers of defense against them. Luckily, you do not have to figure this out yourself as OWASP continuously collects information about real-world attacks and is a great source of documentation.
In our experience, the OWASP TOP 10 list is a useful reference for many systems, not just web applications.
https://owasp.org/www-project-top-ten
https://owasp.org/www-project-api-security
https://cheatsheetseries.owasp.org
https://cheatsheetseries.owasp.org/cheatsheets/REST_Security_Cheat_Sheet.html
https://owasp.org/www-project-proactive-controls
https://owasp.org/www-project-application-security-verification-standard
We want to point out that there is an OWASP TOP 10 list specifically for APIs. We think that these are accurate and from the perspective of penetration testing, we usually find vulnerabilities that match this list.
When you have a basic understanding of these attack vectors it often becomes natural to express them as non-functional requirements and test cases. Then it is easy to add automated unit, integration and system tests, as well as manual exploratory, to verify that our code works as expected, even if someone tries to buy -1 book or set a product id to “DROP TABLE”.
We should add tests to prove that our defense layers works as expected. In this repo we have added tests in two projects, one for unit tests with all dependencies mocked and the other for complete system tests where no dependencies are mocked. Larger projects would most likely require more structure and test on different levels of integrations.
The important part is what kind of tests we added to verify step 2-6 in our model for secure APIs, but this is not a complete test suite for a real world product API.
- Step 1 — This is validated by the web server and infrastructure protection we use, this is not something we represent as tests in our application repo. We write tests for the code we own, even if the system tests we added implicitly will test some parts of step 1, we rely on the tests that the ASP.NET Core team does for Kestrel (validating correct http request format).
- Step 2 — Verify token, is done using system tests on a running instance of the API (integrated with a token service).
- Step 3 — Verify that we get the expected permission set (transform the access token), is done using unit tests for the Permission service. Note that in a real world system this would often involve a database or external service, and then we would need integration tests as well.
- Step 4 — Verify input data, is done using unit test for the ProductId domain type (together with unit test for the Products controller).
- Step 5 — Verify access to the operation, is done using unit tests for the Product service (together with unit test for the Products controller).
- Step 6 — Verify access to the data, is done using unit tests for the Product service (together with unit test for the Products controller).
Note that the unit tests for the Product service also verifies the correct audit logging in order to assert requirements for accountability. And that the system tests we added can be run against the production environment as well. It is important to continuously monitor the actual production environment, do health checks and detect any security misconfiguration in that environment (for example a public API endpoint).
In the article Defense in Depth as Code: Test Driven Application Security we show how to implement this set of test and elaborate some more on the importance of test with focus on security.
Erica Edholm, Omegapoint
We often see teams fail to write tests that verify access to the system. Remember to write negative test cases like
should_return_403_when_not_adminandshould_return_404_when_not_my_data.The OWASP ASVS is a great resource for identifying security test cases.
As a final step in this article, we will see how the OWASP TOP 10 list for APIs maps to the six-step model and how we mitigate each one.
API1:2023 Broken Object Level Authorization
This is when we can reach a data object that is not our own. In our example, we need to verify that the user has access to the product’s market. This vulnerability is widespread and can be a potent attack vector, which we mitigated with step 6.
API2:2023 Broken Authentication
This is perhaps when we forget to require a token or don’t validate all aspects of the token, like the audience, or accept the wrong kinds of tokens. If you use ASP.NET Core, you are in a very good position, with a JWT middleware with secure defaults. We handle this in step 2.
API3:2023 Broken Object Property Level Authorization
This is when you can access too much data on an object, perhaps by automatic parameter mapping supported by the web framework or when serializing the domain object. Adress this by mapping domain objects (DTO:s) to dedicated data contract classes (request-response models). Appying this pattern will mitigate both so called “excessive data exposure” and “mass assignment” issues. It is part of domain logic and we relate this to step 4 and 6.
API4:2023 Unrestricted Resource Consumption
You need to use some infrastructure in front of your API which provides rate-limiting etc. If you are in the cloud, basic protection is this often easy to address. We also do more fine-grained rate-limiting in the service by validating domain rules, like max 100 products per customer. So this is part of both step 1 and the domain logic.
API5:2023 Broken Function Level Authorization
This is when you do not properly validate access to functions. A classic example is that you forget to restrict access to administrative functions. In our model, this is step 5, but you could have additional access controls in front of your API (part of step 1) or before step 4.
API6:2023 Unrestricted Access to Sensitive Business Flows
This is often adressed by domain logic, but also step 2 where the request is authenticed. In our example step 2 could verify if the token is from a trusted system integration client or if it is related to a user session (requering human interaction in the authentiction flow). This is also closely related to step 5 and Broken Function Level Authorization.
API7:2023 Server Side Request Forgery
This is part of step 4, the recommendation is to mitigate this with an allow-list of absolute URI:s. This is not demonstrated in our example, but if you take a look at this presentation from NDC Security we show why it is important.
API8:2023 Security Misconfiguration
Anything misconfigured that is security-related. For example, allowing weak TLS versions. We relate this to step 1.
API9:2023 Improper Inventory Management
This is mitigate by using infrastructure as code, where keeping all configuration under version control will help us keep control of system resources. The same applies to the API endpoints we expose, which is part of source code. Note that keeping source code clean and remove old deprecated functions is an important security aspect.
API10:2023 Unsafe Consumption of APIs
This is addressed by the DDD strategy to implement Zero Trust, with a secure application core. This pattern will e g mitigate injection, we relate this to steps 4 and 6.
Summary
- Build your API with multiple security layers (Defense in depth)
- Security patterns should be opt-out, not opt-in
- Apply Zero Trust and Least Privilege principles
- Visualize your trust boundaries
Do you have to do all of this to create a secure system?
Yes. We can mitigate some types of attacks using only parts of what this article describes. For example, only validating the JWT token protects us against anonymous access but does not limit access to data once you are authenticated. So please consider all the aspects of the six-step model, regardless of platform and frameworks.
We usually find more vulnerabilities in more complex systems, compared to simple systems. It is not just because of the size of the system, where more functionality will give us a larger attack surface. But also because it is difficult for a team to keep a system secure over time that you do not fully understand.
We would like to suggest that you use complexity as a guiding principle for building and architecting your systems. As your system grows and becomes older, please make every effort to keep complexity under control. We fully realize how hard this is, but from our experience with penetration tests, it is vital that your team share an understanding of your system.
We can really recommend reading this 20 year old paper, still valid!
https://www.schneier.com/essays/archives/1999/11/a_plea_for_simplicit.html
Further reading
Defense in Depth as Code: Test Driven Application Security